
Section 1
Quick start
Six steps from box to your first read. The device walks you through steps 3 and 4 itself the first time you turn it on.
-
Charge it
Plug in the USB-C cable. Any standard USB-C charger works. The battery indicator at the top of Settings fills green while it charges, and a full charge from empty takes about two hours.
-
Power on
Hold the power button, the left button under the screens, for about a second. The screens light up with the Plus Putt logo, then the device opens the mode you used last. Hold the same button again to power off. Everything is saved automatically.
-
Pick a language and take the tour
The first time it starts, rotate the dial to choose English, Simplified Chinese or Traditional Chinese and press OK. Six short pages follow that cover the basics. Press OK for the next page, or press OK twice quickly to go back one.
-
Calibrate
Setup finishes with a required level calibration. Set the device on any flat, stable surface, hold still until the bar fills and the screen reads STABLE, then press OK. Turn the device 180 degrees in place, let it settle, and press OK again. It shows CALIBRATED with the offset it stored. The surface does not have to be perfectly level. Turning the device around cancels out any tilt in the surface and leaves only the sensor's own offset.
-
Set distance and green speed
On the main screen the dial adjusts putt distance. Press OK and the dial adjusts green speed, STIMP, instead. Press OK again to go back. A green underline shows which one the dial is on. If you do not know the Stimp, 10 is an average green, 8 is slow and 12 is fast.
-
Take your first read
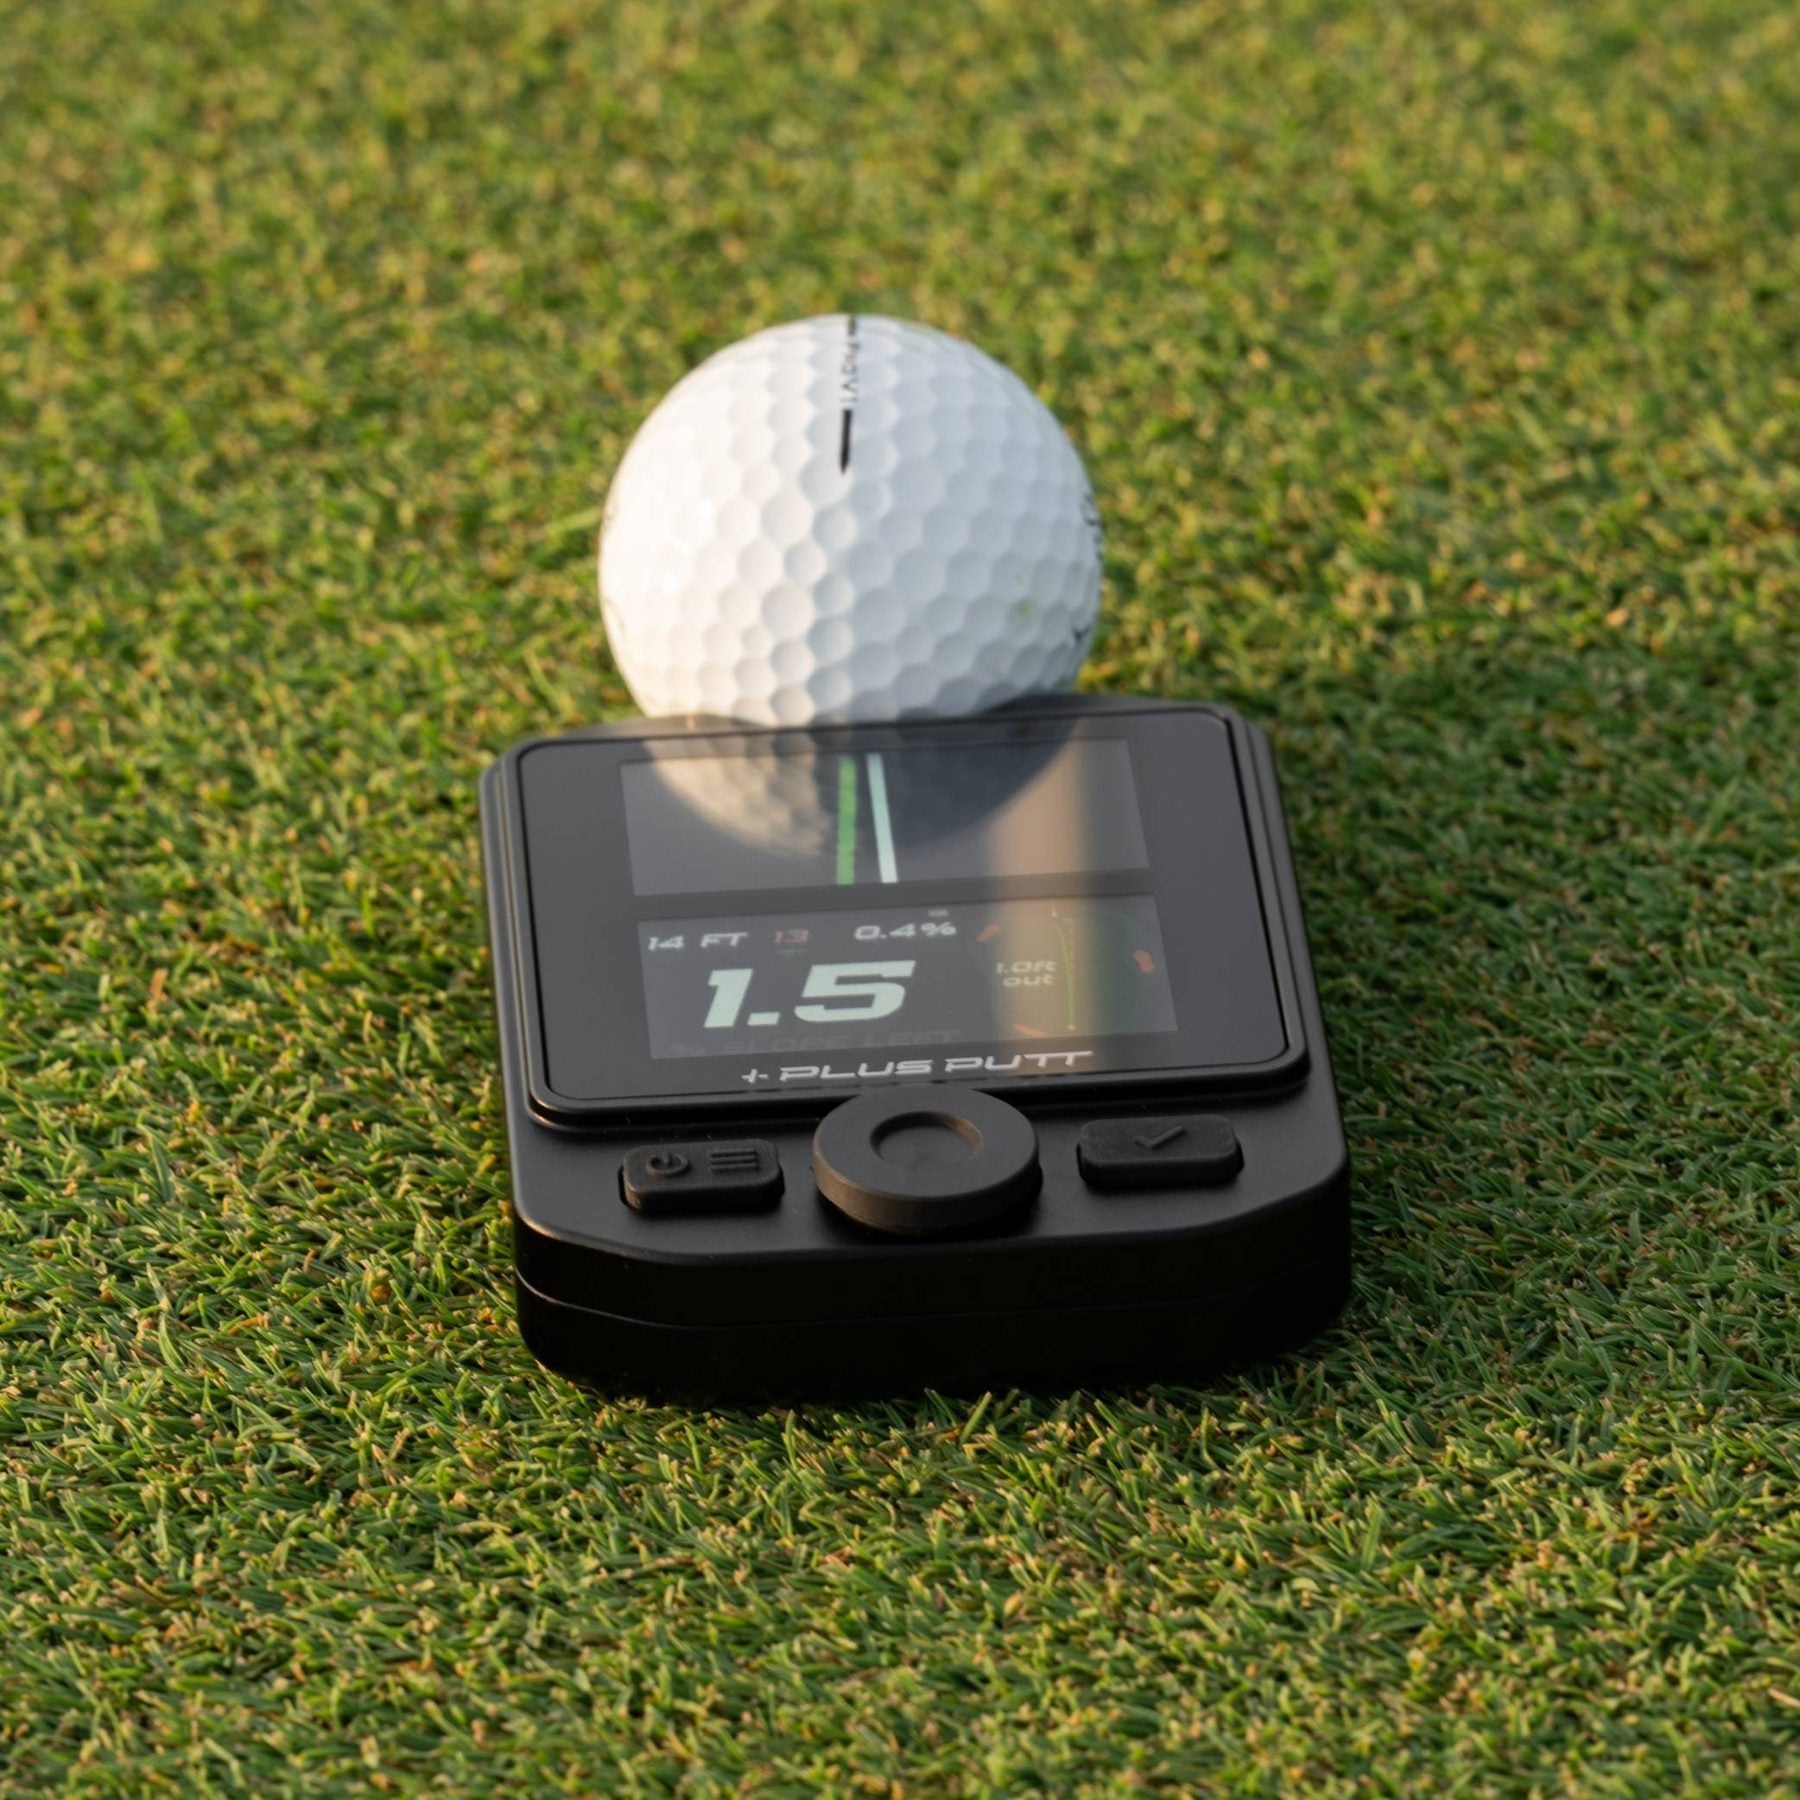
Set the device flat on the green behind your ball with the top edge pointing at the hole, and take your hand off it. Hold still for about a second. The bottom screen shows the slope and how far outside the hole to aim. The top screen shows your start line. Aim there and roll it.


Top edge toward the hole
Every read is taken relative to the direction the device is pointing. Set it down with the screen end aimed at the hole, the same way you would aim a putter face. If it is turned even slightly, the left and right slope changes and so does the read.
In the box
- Plus Putt Break
- Carry bag
- USB-C charging cable
- Quick start card
Section 2
Screens and controls
Two screens, three controls and one green flash. Learn these and every mode makes sense.
Two screens
The top screen is the action screen. It draws your start line as a colored line beside a white reference line that marks straight ahead, and it turns solid green when the putt is level. The bottom screen is the data screen: slope, distance, green speed and the aim offset, plus a mini green in the modes that draw the ball's path. Read the numbers below, then look up and align.

Controls
| Control | What it does |
|---|---|
| Power button, hold | Power on or off. Hold for about a second |
| Power button, press | Open or close Settings. During calibration it is the exit button |
| Dial, rotate | Adjust whatever is active: distance or green speed on the main screen, the highlighted value in Settings, the sliders in Learn |
| OK, press | Confirm a selection, switch which value the dial adjusts, or lock a reading |
| OK, hold | Open or close Settings from any mode. In Multi-Point it resets the read instead |
| OK, double press | Back one step in the setup tour and in Multi-Point |
Remember this one
Press OK on the main screen to move the dial between DISTANCE and STIMP. The value the dial is on is underlined in green. In High Line mode there is a third stop, LINE, that switches between the high and normal line.
What you feel
| You feel | It means |
|---|---|
| Tick on each dial click | The value moved |
| Firm bump | You reached the end of a range. Further clicks do nothing |
| Click on OK | Selection confirmed or value switched |
| Double click | A step completed, such as a locked calibration reading or a finished Multi-Point setup |
| Long pulse | A reset or an exit warning |
| Soft pulse as the screen goes green | The top screen just locked level |
The green screen
In Visualization, Start Line and High Line the top screen fades to solid green, with a pulse you can feel, when the device is pointed along a line with no left or right slope. Pointed at the hole, green means the putt is straight. Rotate the device slowly and watch for green to find the fall line of the green, the direction with zero break. It is a quick way to see which way a green tilts before you read a putt.
Sleep and memory
The device sleeps after 10 minutes without any input. Hold the power button to wake it. Mode, distance, green speed, units, brightness, language and calibration are all saved and come back exactly as you left them.
Section 3
Taking a read
The routine adds a few seconds to your pre-putt and takes the guesswork out of the line.
-
Set the distance
Rotate the dial. The nearest foot is plenty. A one foot error changes the aim by less than half an inch on most putts.
-
Set the green speed
Press OK and rotate to the Stimp. Set it once for the green you are on and every mode uses it. Section 10 has a reference if you are not sure.
-
Place it
Flat on the green behind the ball, top edge at the hole, and take your hand off it. Wind, a footprint, or a hand resting on the case all show up in the number.
-
Let it settle
About a second. The reading is heavily smoothed, so it holds steady once it locks in rather than dancing around.
-
Read the bottom screen
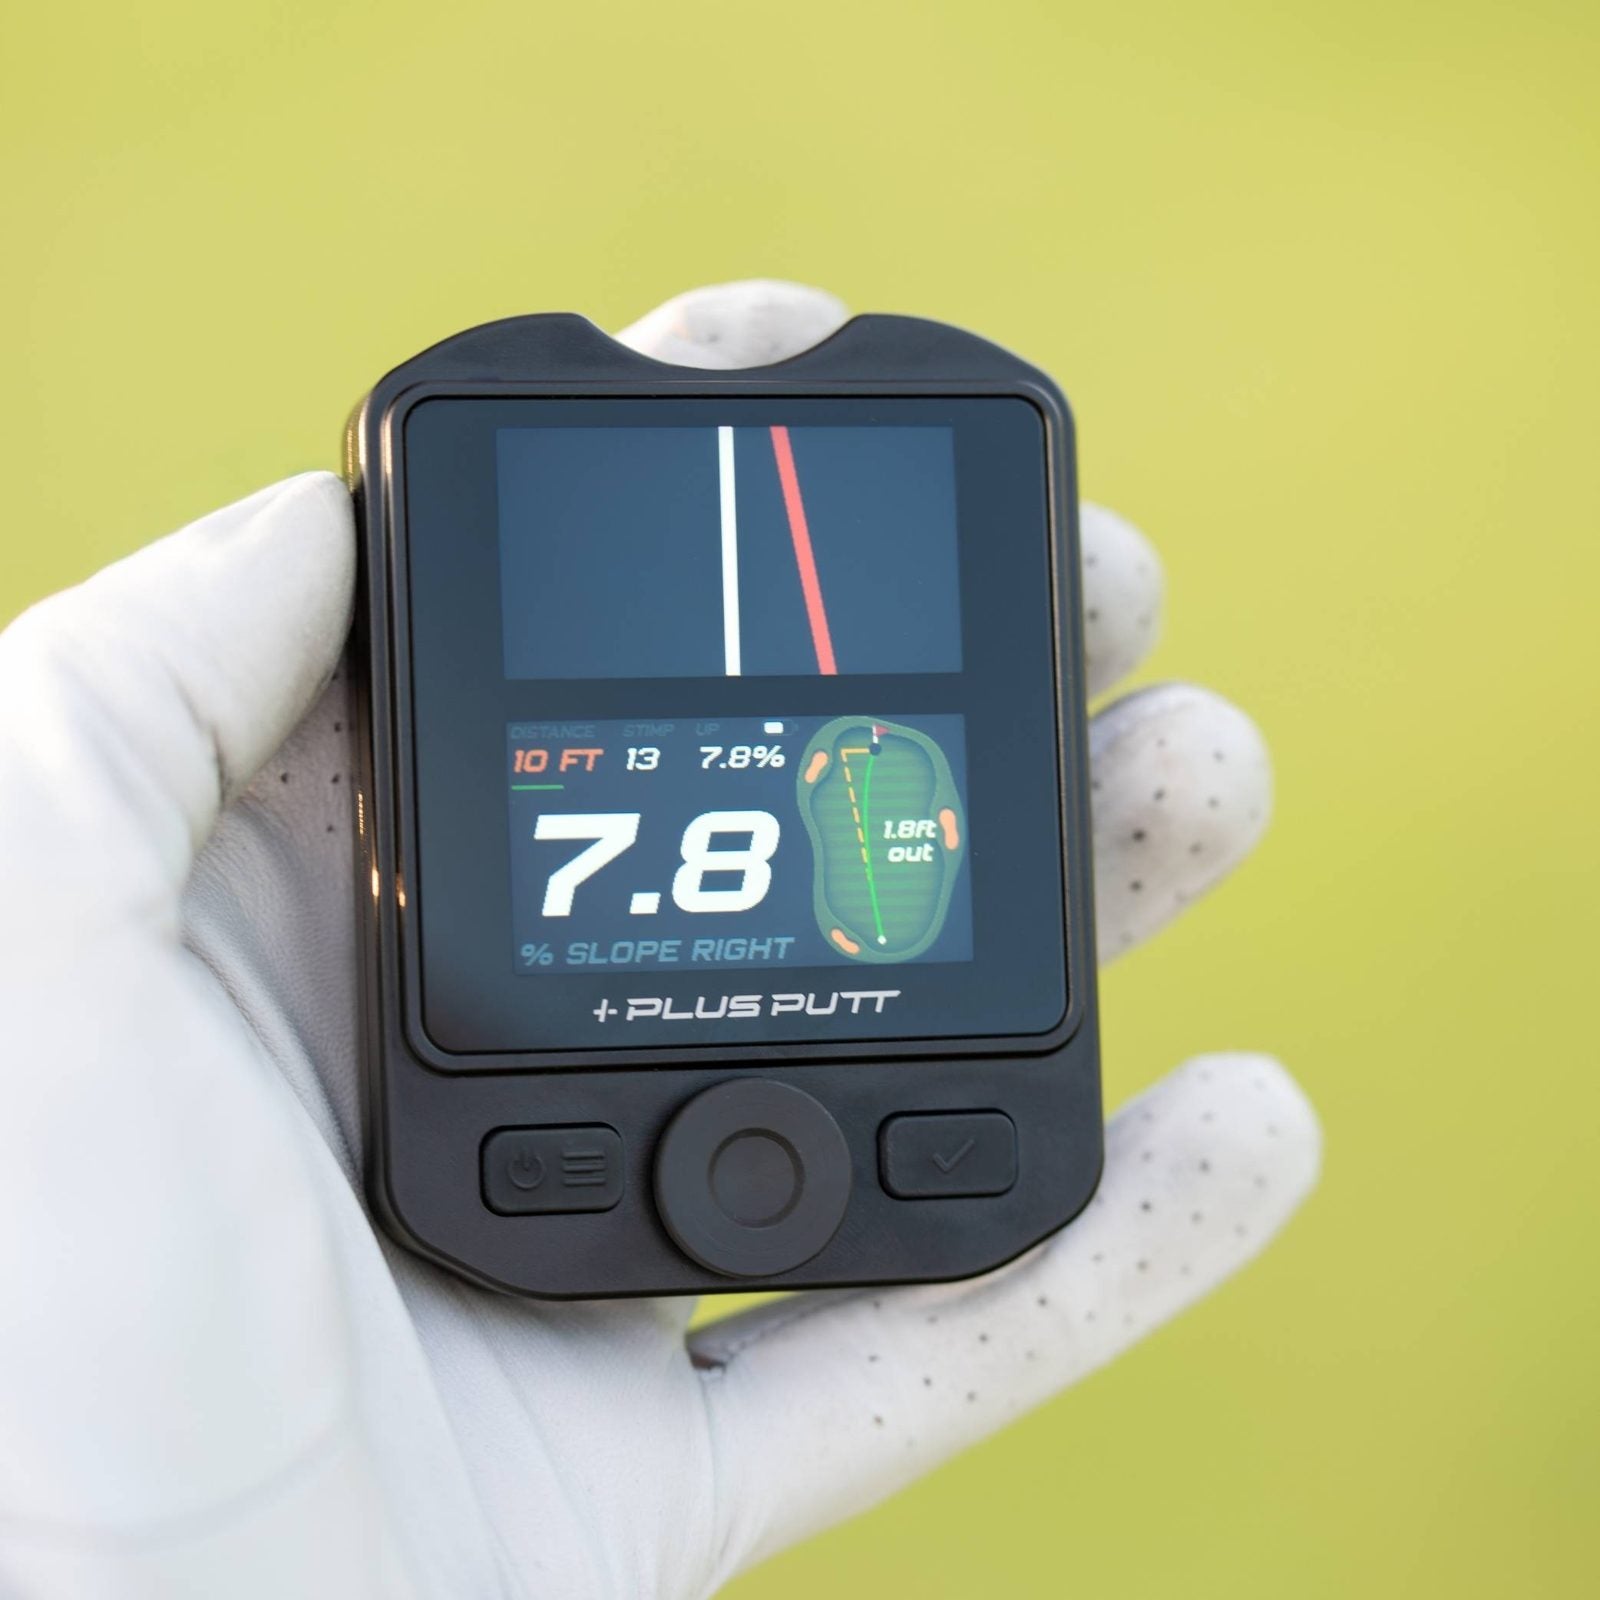
The big number is the left or right slope. SLOPE LEFT means the green falls away to the left, so the ball breaks left and the line points right of the hole. The mini green shows the start line, the curve the ball will take and the aim distance outside the hole, for example 2.7ft out. The smaller UP or DOWN readout is the slope along the putt.
-
Align and roll it
Look up to the top screen. The colored line is your start line, the white line is straight at the hole. Aim your ball's line, or your putter face, along the colored line and roll it at a pace that just reaches the hole.
About pace
Every read on the device assumes a dying pace, the ball arriving with just enough speed to drop. Hit it firmer and it breaks less. If you like to hit putts firm, use the LOW line in Start Line mode. If you like to die them in from above the hole, use High Line.
Section 4
Modes: Read the break
Seven modes live on the device, in this order: Visualization, Slope, Start Line, Play Distance, High Line, Multi-Point and Learn. Change modes in Settings under Device Mode. These three all answer the same question, where to aim, in three different ways.
Mode 1 of 7. The main mode
Visualization
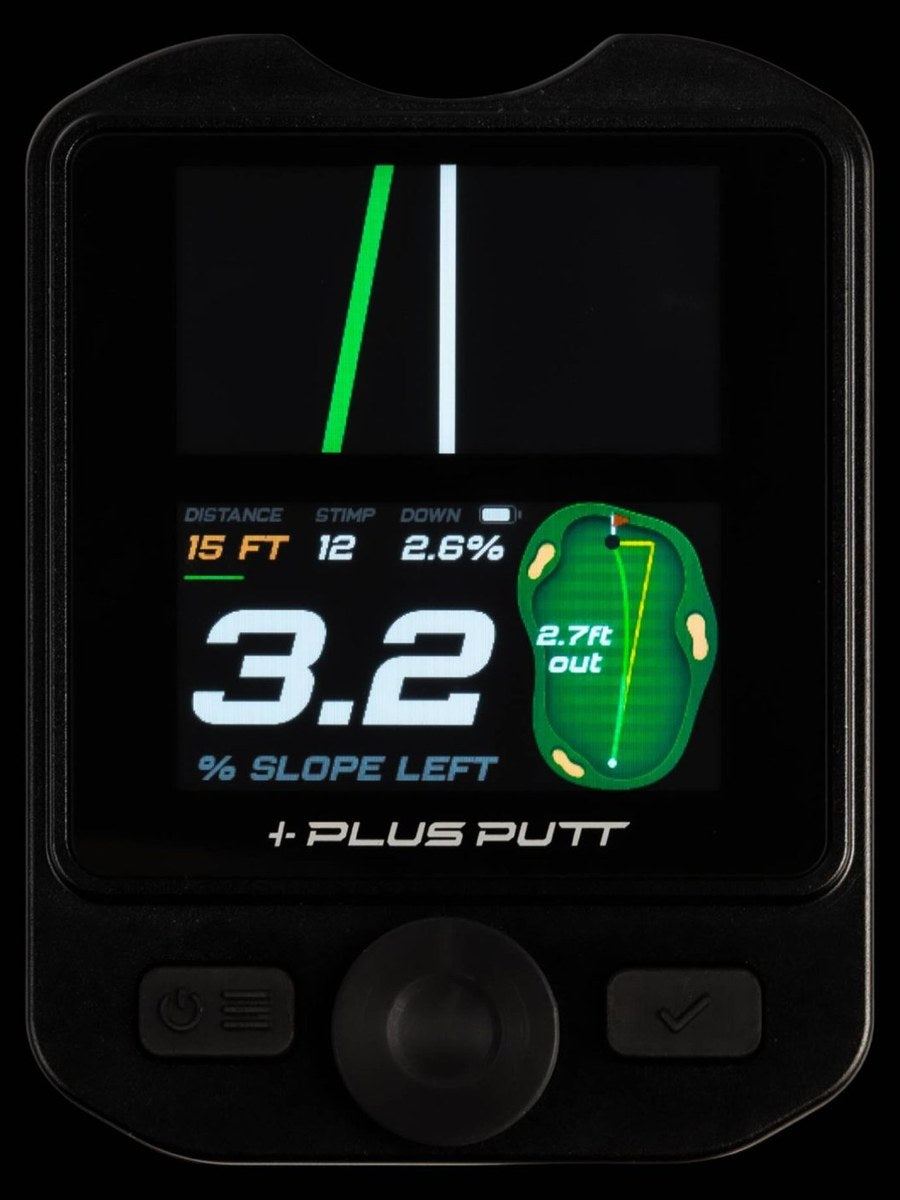
The complete picture. Across the top of the bottom screen are your distance, green speed and the up or down slope. Below that is the big left or right slope number with its direction, and a mini green with the dashed start line, the curved path the ball will take, a ball that rolls it on a loop, and the aim distance outside the hole. The top screen draws the start line full width for alignment and turns green when the putt is level.
How to read it. The color of the start line tells you how severe the slope is: green for gentle, through yellow and orange to red for steep.
Mode 3 of 7
Start Line
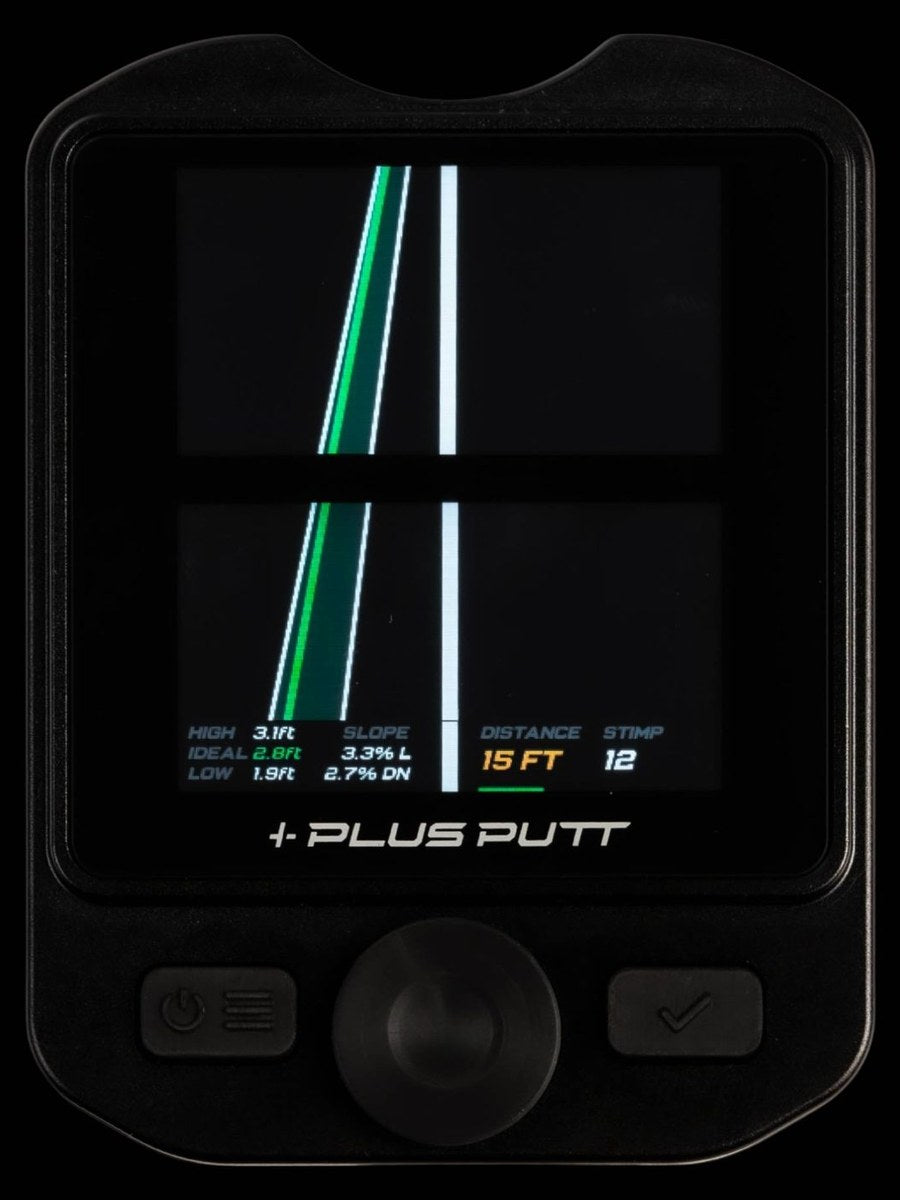
Three lines across both screens. The bright green band is the ideal line for a dying putt. The thin line outside it is the high line, the most you can aim outside the hole and still have the ball fall in. The thin line inside it is the low line for a firm putt, which breaks about a third as much. The aim offsets for all three are listed at the bottom left, with the slope in both axes, distance and green speed beside them.
How to use it. Decide how you want to hit the putt, then pick the matching line. Anything between the high and low lines can go in with the right pace. This is the mode for players who think in aim windows rather than a single aim point.
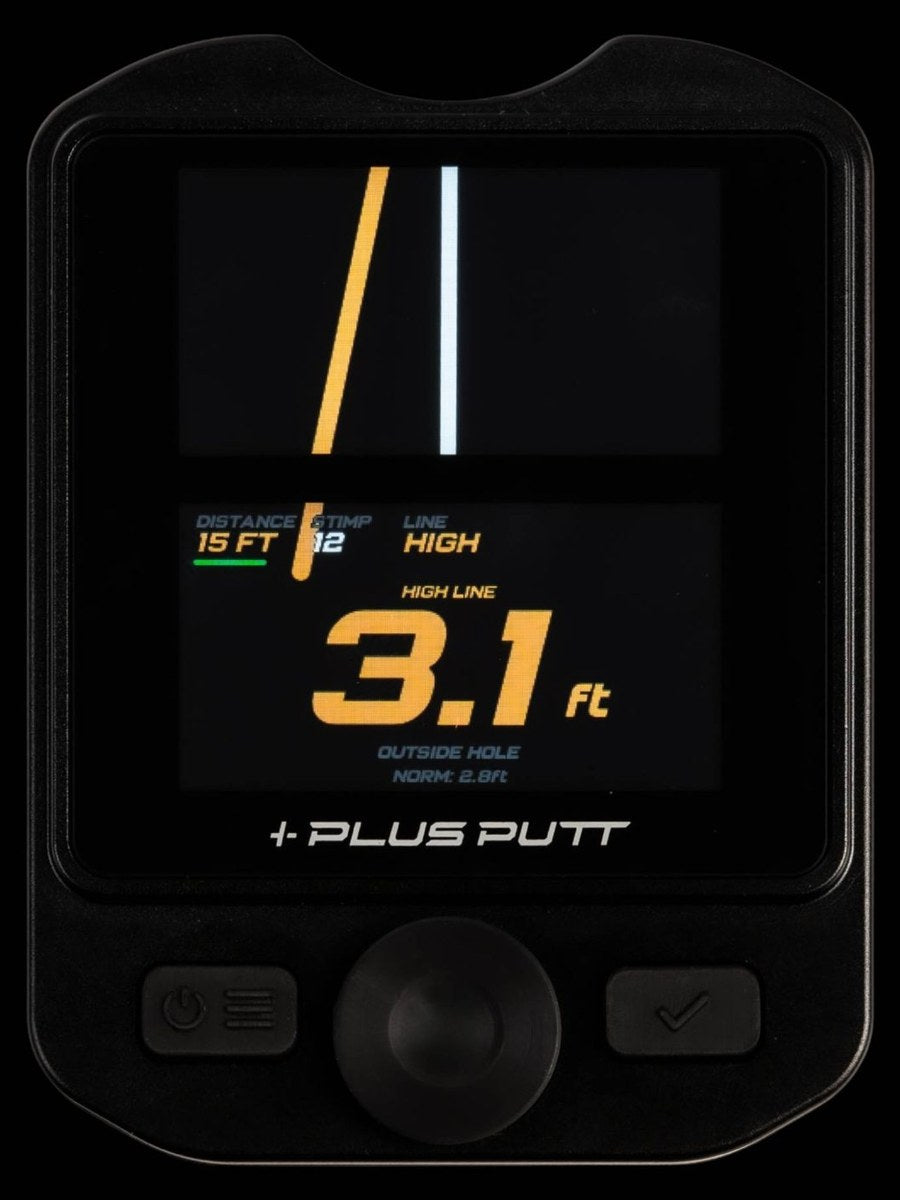
Mode 5 of 7
High Line
For players who like to die putts in from the pro side of the hole. The bottom screen shows the high line aim distance outside the hole as a big amber number, with the normal line underneath for comparison. The top screen draws the high line in amber, and switches to the normal line in green when you select it.
How it is worked out. The high line adds a margin of about one cup width to the normal read, scaled to green speed. Slower greens get more margin, faster greens less. Aim above it and the ball stays out on the high side.
Section 5
Modes: Measure
Two modes that report the ground itself rather than the line.
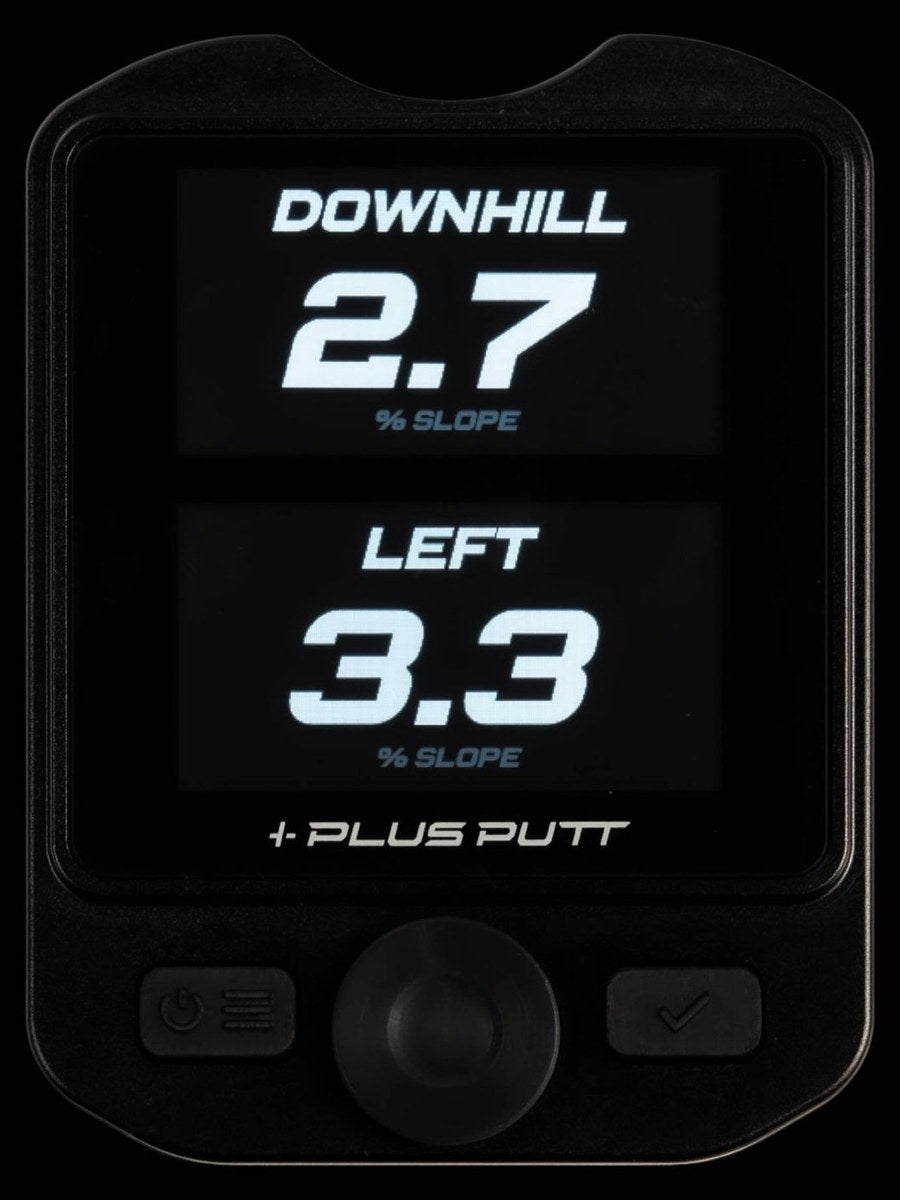
Mode 2 of 7
Slope
A dual axis digital level for greens. The bottom screen reads left or right slope and the top screen reads uphill or downhill, each as a big steady number with a direction word, or LEVEL when flat. No aim calculation, no line, just the surface.
Good for. Checking what your feet are telling you, walking a green before a round to learn its tilts, and showing a student that the putt they think is straight has 1.8 percent of left to right in it.
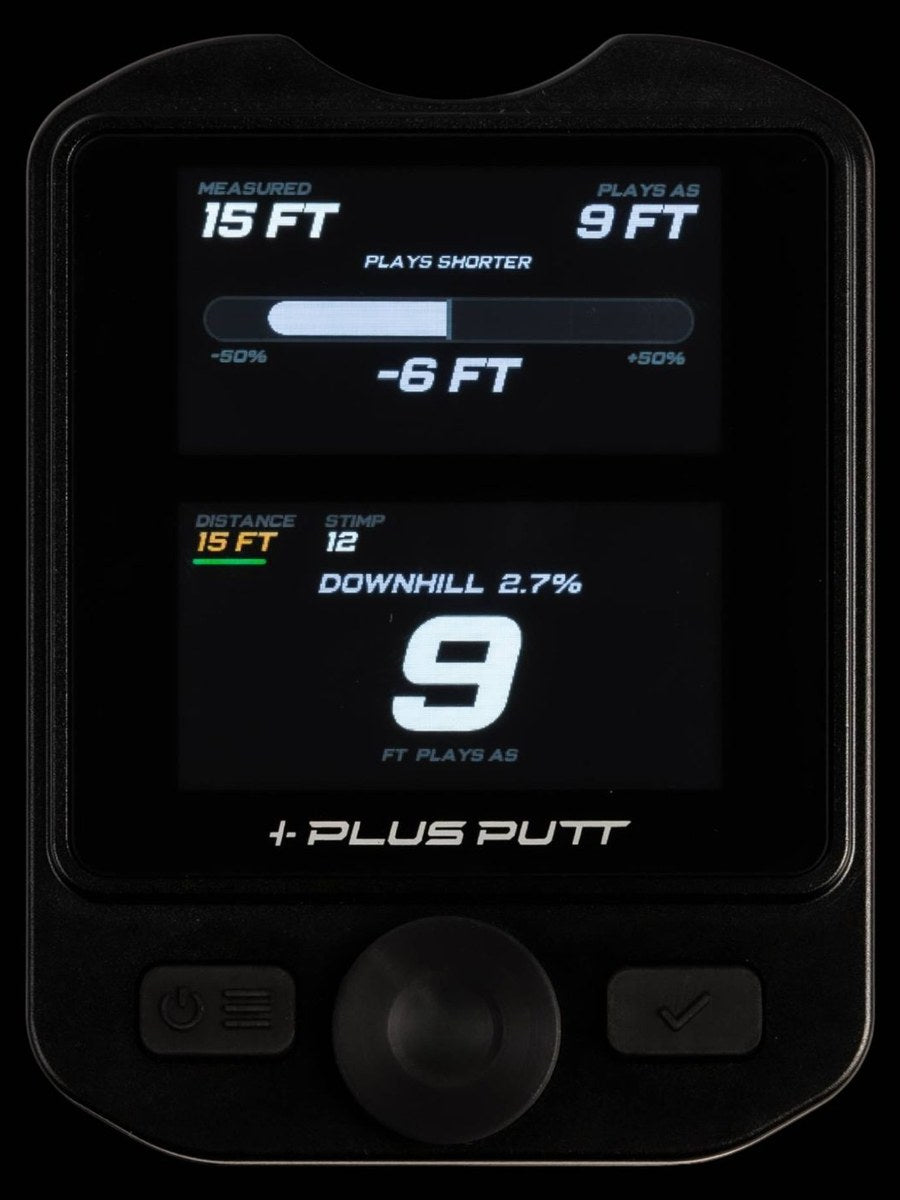
Mode 4 of 7
Play Distance
Slope changes how long a putt plays. Set the real distance and the device shows the distance the putt plays as. The top screen compares MEASURED and PLAYS AS with a gauge that fills toward longer or shorter and the difference in feet. The bottom screen shows the slope along the putt, uphill or downhill, and the plays as number big enough to read from your stance.
Worth knowing. A 10 foot putt up a 3 percent slope on a Stimp 10 green plays like 13.5 feet, and the same putt downhill plays like 6.5 feet. Faster greens push both numbers further from the measured distance. Use the plays as number as your pace reference.
Section 6
Multi-Point
Long putt over a ridge? Read it the way a caddie walks it. Take slope readings at several points along the putt and get one stitched path and one aim answer.
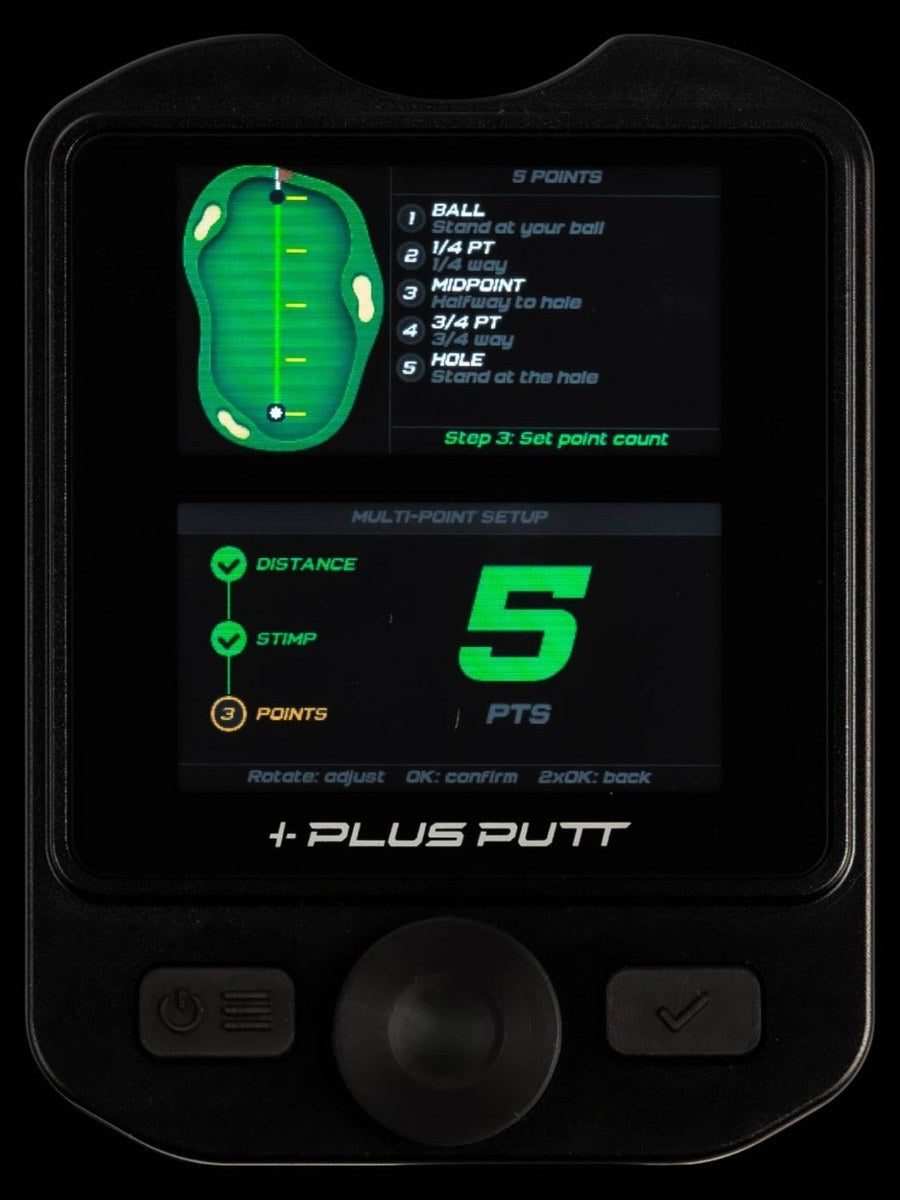
Mode 6 of 7
Multi-Point
A single read at the ball assumes the slope is the same all the way to the hole. On a putt that breaks one way early and another way as it slows near the hole, that is wrong. Multi-Point takes a reading at each point and rolls a simulated ball through all of them in one continuous path, so the result is what the ball actually does, not an average.
Setup
Distance
Rotate the dial to the length of the putt and press OK.
Green speed
Rotate to the Stimp and press OK.
Points
Choose 2 to 6 reading points and press OK. The top screen lists where each point is, for example at your ball, a quarter of the way, halfway, three quarters of the way, and at the hole. Double press OK at any step to go back one.
Reading
Stand at your ball
Set the device down pointed at the hole and let go. When the stability bar fills and the screen reads STABLE, press OK to lock the point. The device uses the reading from just before your press, so the button push does not affect it.
Walk to the next point
Repeat at each point, always with the top edge aimed at the hole. The header tells you where you are, for example PT 2 / 5 at the midpoint.
Finish at the hole
Lock the last point at the hole and the result appears with a double click.
The result
The bottom screen shows the composite path on the mini green, a single aim distance outside the hole, a CONFIDENCE score for how consistent the readings were, and the list of readings. Aim at that one point and putt at normal pace. Press OK to re-read the last point, double press to undo it, or hold OK to start over.
Every point faces the hole
Each reading is taken along the same line, ball to hole. Keep the top edge aimed at the hole at every stop, not at the next point.
Section 7
Learn mode
A simulator. No green required.
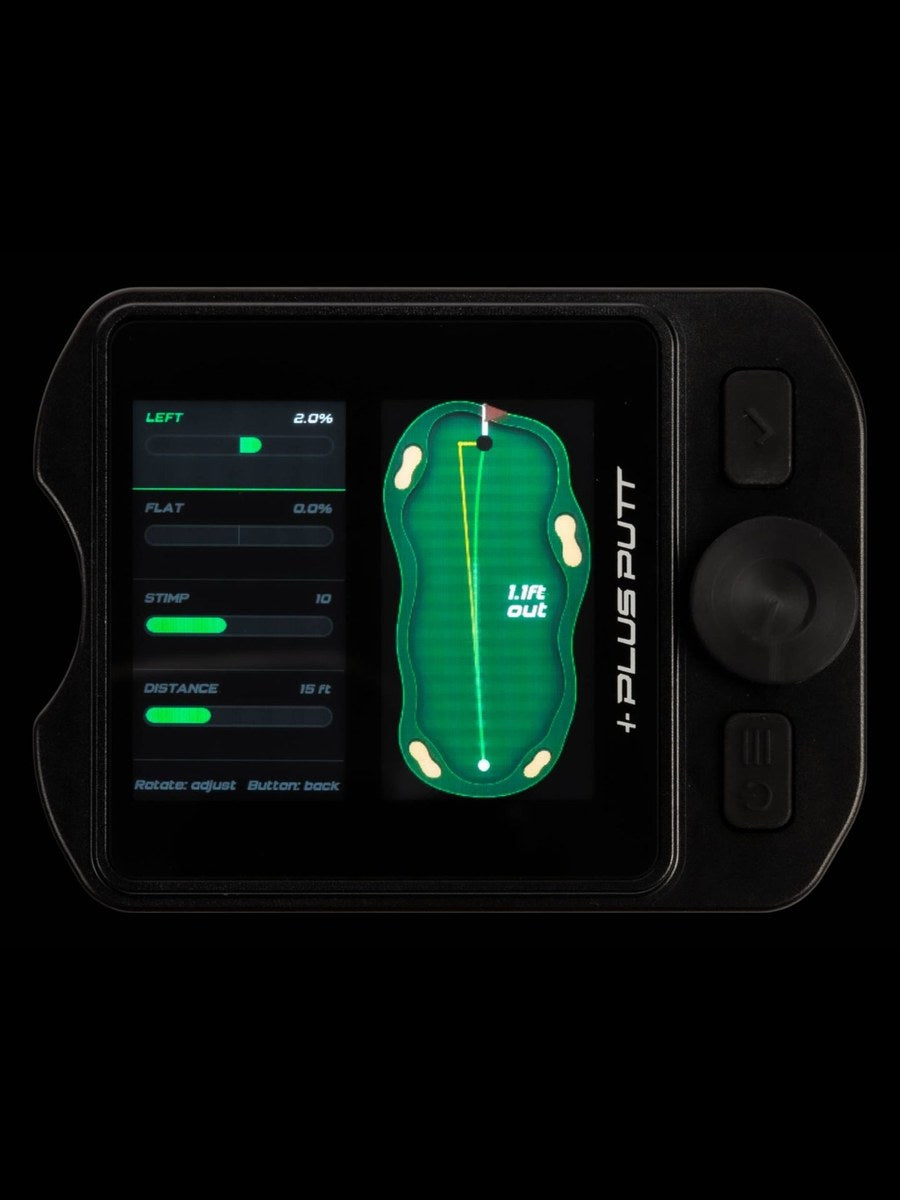
Mode 7 of 7
Learn
Turn the device on its side with the buttons on the right. The left panel has four sliders: left or right slope, uphill or downhill slope, green speed and distance. The right panel is a full size green with the start line, the break curve, a rolling ball and the aim distance, all updating instantly as you move a slider.
What to try. Set 2 percent of left to right at 10 feet and note the aim number, then push the Stimp from 8 to 13 and watch the same slope break almost twice as far. Add 3 percent uphill and see how little the line changes but how much the pace does. Ten minutes in Learn builds the eye you use on the course.
Section 8
Settings
Press the power button from any mode, or hold OK. Rotate to scroll, press OK to select. Press the power button again to close.
For a value setting, OK highlights the value in amber, the dial changes it, and OK confirms. For on and off settings, OK simply switches them. The battery percentage sits at the top of the list, and the top screen describes whatever is highlighted.
| Setting | What it does |
|---|---|
| Device Mode | Choose one of the seven modes. The top screen describes each one as you scroll |
| Units | Percent or Degrees for every slope readout |
| Precision | Tenths, such as 2.4, or whole numbers, such as 2 |
| Putt Distance | The same distance the dial sets on the main screen |
| Distance Units | Feet, Meters or Yards. Feet move by the foot, meters by half a meter, yards by half a yard |
| Green Speed | Stimp 6 to 15, with Slow, Med, Fast and Tour reference marks at 8, 10, 12 and 14 |
| Display Brightness | 1 to 10, for sun or living room |
| Haptics | All vibration feedback on or off |
| Language | English, Simplified Chinese or Traditional Chinese |
| Calibrate Level | Runs the level calibration. Shows Done or Not set |
| Firmware Version | The version running on your device. Have it handy if you contact us |
| Factory Reset | Rotate to YES and press OK. Erases all settings and calibration, keeps the session count, and runs the welcome setup at the next power on |

Section 9
Calibration
Under a minute, on any stable surface, and it does not need to be level.
Calibration corrects the sensor's own small offset. It runs once during setup and you can repeat it any time from Settings, Calibrate Level. Run it again if a surface you know is flat reads a few tenths off, after the device has been through a big change in temperature, or after a factory reset.
Start it
Open Settings, select Calibrate Level and press OK.
First reading
Place the device on a flat, stable surface with the top edge pointing away from you and hold still. The bar fills as the reading settles and the screen reads STABLE, OK to lock. Press OK.
Turn it around
Rotate the device 180 degrees in place so it points back at you. Let it settle again and press OK.
Done
The screen shows CALIBRATED with the offset it stored. Press OK to continue.
Why the half turn works
Two readings taken 180 degrees apart see the surface tilt in opposite directions, so it cancels out when the device averages them. What is left is the sensor's own offset, which is stored and removed from every read from then on. That is why the surface only needs to be stable, not perfectly level.
To leave early, press the power button. The screen asks EXIT? Press the power button again to leave without saving, or OK to keep going.
Section 10
Green speed and the numbers
The same slope breaks a putt further on a faster green, so the Stimp matters. Here is how to pick one, and what every readout means.
Green speed reference
| Preset | Stimp | Typical of |
|---|---|---|
| Slow | about 8 | Public courses, early mornings, winter greens, greens that have not been mowed recently |
| Medium | about 10 | Average club course conditions. The most common speed for regular play |
| Fast | about 12 | Private clubs, well maintained courses, weekends when greens are rolled and cut |
| Tour | about 14 | Championship conditions and tournament greens |
Set it in Settings under Green Speed, or press OK on the main screen and rotate. A one Stimp error changes the aim by roughly 10 percent, which is inside the margin of most strokes, so a good guess is fine. Many pro shops post the day's Stimp.
What the numbers mean
- Slope, percentRise per 100 of run. 2 percent means the surface climbs 2 inches over 100 inches. The format used in AimPoint Express
- Slope, degreesThe same tilt as an angle. 2 percent is about 1.1 degrees. Switch under Units
- Left, rightWhich way the surface falls across the putt. SLOPE LEFT means the ball breaks left
- Up, downThe slope along the putt, uphill or downhill. It changes the pace, and a little of the break
- Aim outside the holeThe distance from the center of the cup to your aim point, measured at the hole. 6 inches right means aim at a spot 6 inches right of the center of the hole
- Ideal lineThe start line for a putt that dies at the hole. The standard read
- High lineThe most you can aim outside the hole and still fall in. The ideal line plus about a cup width, scaled by green speed
- Low lineThe start line for a firm putt, about a third of the break
- Plays asThe effective length of the putt once the up or down slope is accounted for
- ConfidenceIn Multi-Point, how steady and consistent your readings were
Section 11
Charging and battery
- Charge over USB-C with any standard charger. A full charge from empty takes about two hours.
- The battery indicator at the top of Settings fills green while charging and shows full when it is done. Leave it plugged in safely.
- Roughly 28 to 30 hours of continuous use per charge, which is weeks of normal practice.
- The device sleeps after 10 minutes idle, and holds its charge on the shelf for months when off.
- Below 15 percent the indicator flashes. When the cell gets very low the device shows a charge screen and puts itself to sleep to protect the battery.
- If it ever runs flat, just plug it in. Give it a few minutes and it will power on normally.
- It is safe to store the device partially charged.
Section 12
Care
- Wipe the screens with a soft dry cloth. No solvents or abrasive cleaners.
- The screens are covered with tempered glass. It is tough, not scratch proof, so avoid setting the device face down on rough surfaces.
- The aluminum body is water resistant, not waterproof. Wipe it off after a wet round and never submerge it.
- Do not leave it in a hot car. Lithium batteries age quickly in the heat.
- Keep the USB-C port clear of sand and grit before plugging in.
- Keep it in the carry bag between sessions.
Section 13
Troubleshooting
Nearly every question we get is one of these.
The number will not settle
Set the device down and take your hand off it. A hand on the case, wind, or a spike mark under one corner will keep it moving. Give it a full second or two, and if it still wanders on a surface you know is steady, run Calibrate Level.
A flat surface does not read zero
Run Settings, Calibrate Level. It removes the sensor's fixed offset, and because the routine turns the device 180 degrees between readings the surface itself does not need to be level.
The top screen never turns green
Green only appears when the device is pointed along a line with less than half a percent of left or right slope. On a breaking putt that is not the direction of the hole, so it will not turn green when aimed at the hole. Rotate it slowly to find the fall line. Green is a confirmation, not a requirement, so the read is valid without it.
The break looks too big or too small
Check the Stimp first, then the distance. Remember the read assumes a dying pace. A putt hit firm breaks less, so use the LOW line in Start Line mode if that is how you putt.
The dial is changing the wrong thing
Look for the green underline. Press OK to move it between DISTANCE and STIMP. In High Line the third stop is LINE, and in Learn each press moves to the next slider.
Multi-Point will not lock a point
Hold still until the bar fills and the screen reads STABLE, then press OK gently. Each point needs the device on the ground and pointed at the hole. Double press OK to redo a point, or hold OK to start the read over.
It will not turn on
Hold the power button for a full second. After a factory reset or a flat battery the device stays off until you press power. If nothing happens, charge it for 15 minutes and try again.
The screens went dark
It sleeps after 10 minutes without input. Hold the power button to wake it. Your mode and settings are still there.
Wrong language
Open Settings, scroll to Language and press OK to cycle through English, Simplified Chinese and Traditional Chinese. The whole interface changes immediately.
I want to start completely fresh
Settings, Factory Reset, rotate to YES and press OK. This erases settings and calibration, then the device sleeps. Hold power to restart and the welcome setup runs again.
Section 14
FAQ
Does it need a phone?
No. Everything runs on the device. There is nothing to pair, nothing to download, and no subscription, ever.
Does it work on any green?
Yes. It reads the actual surface in front of you, so there are no course maps to load. Any green, anywhere, in any conditions.
How accurate is it?
The sensor resolves slope to a tenth of a percent and the reading is heavily stabilized, so it is steady and repeatable. The break model is physics based and accounts for distance, green speed and both slope axes. Grain, moisture and footprints add real world variation that no read can see, so treat the number as a very good starting point and let your pace do the rest.
Can I use it in competition?
Plus Putt Break is a practice and training aid. Rules on green reading devices vary by competition, so check the rules of play for your event before using it during a round.
Left handed?
Yes. Slope reads and break direction are the same for everyone. Aim where the line points.
Indoors or outdoors?
Both. Learn mode needs no green at all, and Display Brightness goes from 1 to 10 for sun or living room.
Percent or degrees?
Percent is what most green reading systems, including AimPoint Express, use and is the default. Degrees show the true tilt angle for players who prefer it. Both read the same surface.
What is Stimp?
A measure of green speed. The higher the number, the faster the green and the more a putt breaks. See Section 10 for typical values.
Is there a warranty?
Yes. Plus Putt Break includes a 1 year warranty.
Section 15
Specifications
| Displays | Two 1.9 inch color IPS displays, 320 by 170, with tempered glass covers |
| Sensor | Precision MEMS accelerometer, dual axis |
| Slope range | Plus or minus 8 percent, about 4.6 degrees, with 0.1 percent resolution |
| Slope units | Percent or degrees, tenths or whole numbers |
| Green speed | Stimpmeter 6 to 15 |
| Putt distance | 1 to 30 feet, 0.5 to 9 meters, or up to 10 yards |
| Modes | Visualization, Slope, Start Line, Play Distance, High Line, Multi-Point, Learn |
| Controls | Rotary dial, OK button, power button |
| Feedback | Haptic motor, can be switched off |
| Languages | English, Simplified Chinese, Traditional Chinese |
| Battery | 2000 mAh rechargeable lithium ion, USB-C charging |
| Battery life | About 28 to 30 hours of continuous use. Sleeps after 10 minutes idle |
| Calibration | Guided level calibration, re-runnable from Settings |
| Connectivity | None required. Fully standalone |
| Firmware | v2.1.0, updatable |
| Body | Aerospace grade aluminum, CNC machined |
| Weight | 170 g |
| Warranty | 1 year |
| Assembly | Designed and assembled in the USA |